
Controlling your computer screen’s brightness can help reduce eye strain and make your battery last longer. In bright environments, you would typically want your screen to be bright as well. However, in darker environments, many prefer to lower their brightness.
This guide shows you how to change the screen brightness on Windows.
Using the Monitor’s Physical Control
If you’re using an external display (e.g., a monitor), you’ll need to use the display’s physical controls to change the screen brightness. There is usually a button on the side or front of the device.

Using Keyboard Shortcuts
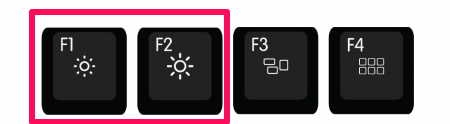
The easiest way to change screen brightness in Windows 11 is using shortcut keys. These keys differ from one manufacturer to another. Usually, they are marked by a Sun symbol with plus and minus signs, and you can find them at the top of your keyboard or arrow keys.
In most cases, you must press the fn key before pressing the shortcut key to adjust your screen brightness. However, some laptops include separate keys for adjusting screen brightness, and you can simply press these buttons to alter your display’s brightness.
Using Quick Settings
Quick Settings is a Windows 11 feature that allows you to adjust the brightness, volume, and other settings without going to the Control Panel.
- Click the Action Center icon in the notification area on the right side of the taskbar.
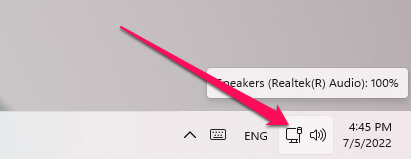
Click the Action Center icon. - Once you’re in Quick Settings, you can click and drag the brightness slider to the left or right to lower or raise the screen brightness, respectively.

Drag the brightness slider to the left or right.
Using Settings
- Click the Start button, then press the Settings icon.

Open the Settings app. - Go to System > Display.

Go to System > Display. - Use the slider to change the screen brightness.
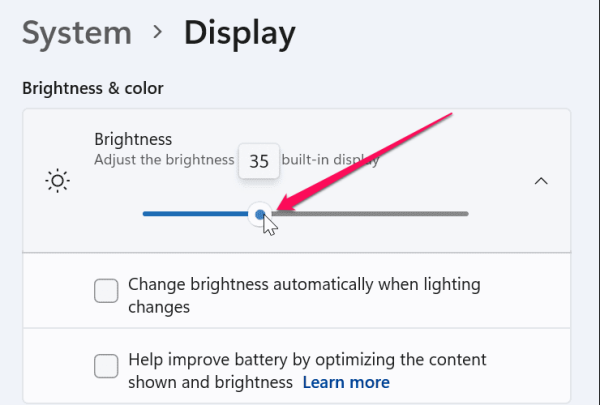
Adjust the brightness level slider.
Using the Mobility Center
The Mobility Center is a feature only available on laptops. It allows you to quickly change the settings of your laptop, such as volume, screen brightness, and battery status.
- To open the Mobility Center, press the Windows key + X. Alternatively, right-click the Start button and select Mobility Center.
- Under Display brightness, use the slider to change the screen brightness.
Use the slider to change the screen brightness.
Using PowerShell
Windows PowerShell can automate almost any operation in the Windows ecosystem. One of its many utilities is to change the screen brightness.
- Go to Start, then type in “powershell.” Right-click Windows PowerShell and select Run as Administrator.

Run PowerShell as administrator. - In the PowerShell window, type the following command and press Enter:
(Get-WmiObject -Namespace root/WMI -Class WmiMonitorBrightnessMethods).WmiSetBrightness(1,<Brightness Level>)
Replace <Brightness Level> with a value between 0 and 100 to set the screen brightness. A setting of 0 will be the minimum brightness, while 100 will be the maximum.
Enter the command.
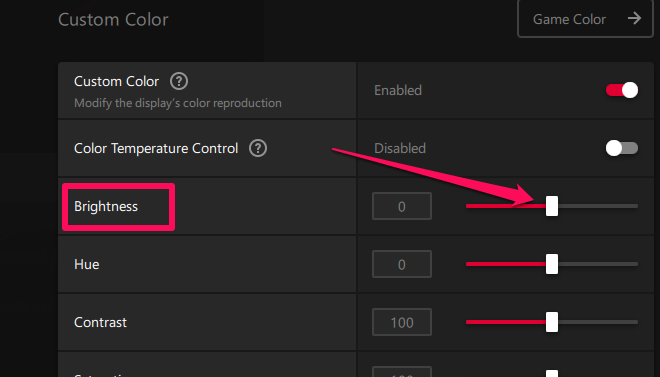
Depending on your video card, you might have a dedicated control panel with brightness settings. For example, NVIDIA and AMD have control panels that allow you to change the screen brightness. In this example, I will use the AMD Radeon Settings.
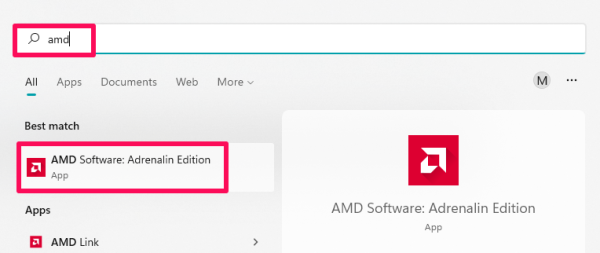
- Go to the search menu, type “amd,” then open the AMD software edition you have.
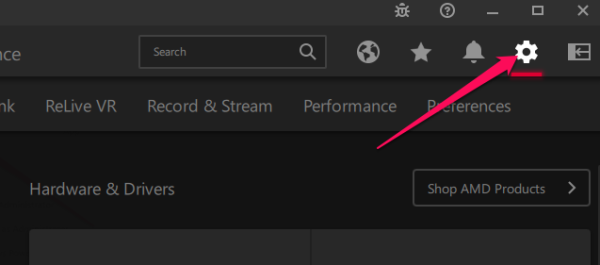
Open the AMD software edition you have. - In the top right corner, select Settings.
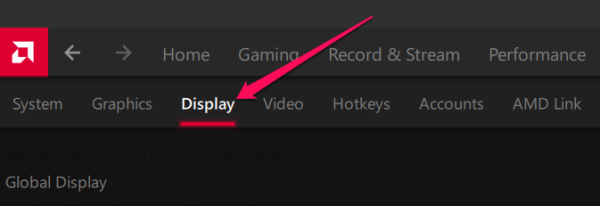
Click Settings. - Click the Display tab.
Click the Display tab. - Next to Brightness, use the slider to change the screen brightness.
Use the slider to change the screen brightness.