
When the Remote Desktop Connection is unable to connect with an RDP server, it will show the error message “An internal error has occurred”.
This usually happens because of configuration issues related to how you set up your Remote Desktop Connection or security issues.
This guide will help you fix the problem so you can successfully connect to your RDP server.
Ensure the remote connection is enabled
Sometimes, the remote connection can be disabled on your computer. Before anything else, you should check it and enable it if it’s turned off.
- Go to the Start menu > Settings.

Open the Settings app. - Scroll down and click Remote Desktop.

Click Remote Desktop. - Toggle the “Remote Desktop” button to On.

Toggle the button to on. - Click Confirm to turn on the service.

Click Confirm.
Restart Remote Desktop Services
Remote Desktop Services allows you to connect to a remote computer and work with it as if you were sitting in front of it. If this service has a problem, you can’t establish a connection with an RDP server. A simple restart of the Remote Desktop Services service will often fix the problem.
- Right-click This PC from your desktop and select Manage.

Select Manage. - Click Services and Applications from the left panel.

Click Services and Applications. - Press Services from the right panel.

Press Services. - Scroll down and find Remote Desktop Services.

Find Remote Desktop Services. - Right-click the service and select Restart.

Select Restart.
Disconnect and re-connect the domain
If you are connected to a domain in an organization (work or school), this domain can encounter problems that prevent you from connecting to an RDP server. Disconnecting and reconnecting the domain can fix this problem.
Note: You must have another account with administrator privileges to open your computer with it.
- Click the Windows key + I to open the Settings app.
- Go to Accounts > Access work or school.

Go to Accounts > Access work or school. - Highlight the domain you are connected to and click Disconnect.

Click Disconnect. - A prompt will appear asking if you want to leave the domain. Click Yes.

Click Yes. - Another confirmation message will appear, read it carefully then click Disconnect.
Click Disconnect. - Restart your computer to complete the process.
- Re-join the domain again.
Configure your Windows Firewall to connect to RDP
By default, Windows Firewall blocks all incoming connections not on the safe list. To allow RDP connections to your PC, you must add the Remote Desktop rule to Windows Firewall.
- Go to Start menu > Settings.
Go to Settings. - Go to Privacy & security > Windows Security.

Go to Privacy & security > Windows Security. - Select Firewall & network protection.

Select Firewall & network protection. - Click Allow an app through firewall.

Click Allow an app through firewall. - Click Change settings.

Click Change settings. - Scroll down and check the Remote Desktop box and both the Public and Private boxes.

Check the Remote Desktop box and both the Public and Private boxes. - Click OK to save the changes.

Click OK.
Disable Network Level Authentication
Network Level Authentication (NLA) is a security feature that requires users to authenticate themselves before they can establish a remote connection to an RDP server. Disabling this feature will allow you to connect to an RDP server even if the authentication fails for some reason. However, after troubleshooting this, it is recommended you leave NLA on for security purposes.
- Go to Start menu > Settings.
Select Settings. - Go to Privacy & security > For developers.

Go to Privacy & security > For developers. - Click Show settings next to Change settings to allow connections only from computers running Remote Desktop with Network Level Authentication.

Click the Show settings button. - In the System Properties window, uncheck the box next to Allow connections only from computers running Remote Desktop with Network Level Authentication.

Uncheck the box. - Click OK and check if the problem is resolved.

Click OK.
Change the settings for your Remote Desktop connection
The normal TCP port for a Remote Desktop Host (RDH) is “3389.” So you need to run a simple command to check if this port is open and listening.
- Go to Start menu > search for “powershell” > right-click PowerShell > Run as Administrator.

Run PowerShell as administrator. - Enter the following command and hit Enter:
Test-NetConnection WS16-DC1 –port 3389Check the RemotePort value and see if it’s equal to 3389.

Check the RemotePort value. - If the number is not equal to 3389, you need to change the value of the port. To do that, press Windows key + R to open the Run dialog box. Then, type “regedit” in the box and hit Enter.
- In the Registry Editor, go to the following key:
HKEY_LOCAL_MACHINESystemCurrentControlSetControlTerminal ServerWinStationsRDP-Tcp - Locate the PortNumber and double-click it to open its properties.
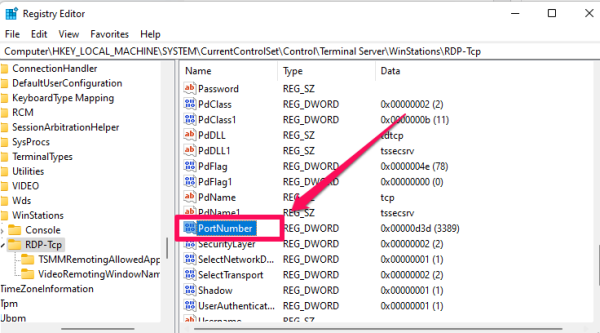
Locate the PortNumber. - Change the Base to Decimal and type in 3389 in the Value data field.

Change the Base to Decimal and type in 3389. - Click OK to save changes and restart your computer. After the restart, check if the problem is resolved.

Click OK.
Change the startup status of the RDP service to automatic
If your Remote Desktop Protocol (RDP) isn’t set to automatic, it will not automatically start when you open your computer. In this case, you will need to set it to automatic.
- Go to Start > Run and type “services.msc”.

Type services.msc in the run dialog box. - Double-click Remote Desktop Services.
Double click Remote Desktop Services. - Click Stop to stop the service.

Click Stop. - Go to the Startup section and select Automatic from the drop-down menu.

Select Automatic. - Click OK to save the changes.

Click OK. - Restart your computer.
Change the MTU value
The maximum transmission unit (MTU) is the largest size packet or frame, specified in octets (eight-bit bytes), that a network can transmit. A lower MTU can be useful when facing connection or latency issues.
- Click the Start menu and type “cmd”. Launch Command Prompt as administrator.

Run cmd as administrator. - Type the following command but replace “Ethernet” with your active network connection:
netsh interface ipv4 set subinterface "Ethernet" mtu=1458
Run the command.
You can also use TCP Optimizer software that allows you to change your MTU value easily.
- Open TCP Optimizer as an administrator.
- At the bottom right of the main interface, click Custom.

Click Custom. - Set the MTU value to 1458 and click Apply changes.

Set the MTU value to 1458.
Enable persistent bitmap caching
Persistent Bitmap Caching might be disabled on your computer. If this is the case, you need to enable it.
- Press Windows + R to open the Run dialog box. Type “mstsc” and hit Enter to launch the Remote Desktop Connection application.

Launch run, type mstsc, and press Enter. - Click Show Options.

Click Show Options. - Go to the Experience tab.

Go to the Experience tab. - Check the box next to Persistent bitmap caching, and click Connect.

Check the box next to Persistent bitmap caching, then click Connect.
Change the RDP security settings
When the security settings for the RDP are not configured correctly, you will encounter the “An internal error has occurred” error. To fix this problem, you can use the Group Policy Editor.
- Click Windows + R to open the Run dialog box. Type “gpedit.msc” and hit Enter to launch the Local Group Policy Editor.

Type gpedit.msc and press Enter. - Navigate to Computer Configuration > Administrative Templates > Windows Components > Remote Desktop Services > Remote Desktop Session Host > Security.
- Double-click Require use of specific security layer for remote (RDP) connections.

Double-click the highlighted option. - Select Enabled and ensure Security Layer is set to RDP.

Select Enabled and set Security Layer to RDP. - Click OK and restart your computer.

Click OK.
Turn off any VPN connections
If you have any VPN connections turned on, then this might be the problem. VPNs sometimes route all traffic through their servers rather than just web traffic. This can prevent your computer from establishing a connection to the RDP server. First, turn off any third-party VPNs you have open. You can also turn VPNs off from within Windows Settings:
- Open the Start menu and go to Settings.
Open the Settings app. - Click Network & internet and select VPN.

Select VPN. - If you have any VPN connections, click Disconnect.

Click Disconnect. - Check if the issue persists.
Reconfigure the local security policy
Incorrect settings in the local security policy can cause the “An internal error has occurred” problem. To fix the issue, you can change local security policy settings.
- Press Windows + R to open the Run dialog box. Type “secpol.msc” and hit Enter to launch Local Security Policy.

Type secpol.msc in Rub. - Go to Local Policies > Security Options.

Go to Local Policies > Security Options. - Scroll down and double-click System cryptography: Use FIPS compliant algorithms for encryption, having, and signing option.

Double-click the highlighted option. - Select Enabled from the pop-up window, then click OK.

Select Enabled and click OK. - Restart your computer.
Disable static IP address
If the server you are trying to connect to has network-layer restrictions, then the connection might fail. The network-layer restriction usually prevents the server from accepting any incoming connections routed through a static IP address. A possible solution is to switch from static to DHCP IP.
- Click Windows + R to launch the Run dialog box. Type “ncpa.cpl” and hit Enter to open the Network Connections window.

Launch ncpa.cpl in Run. - Right-click your active network connection and select Properties.

Select Properties. - Switch to the Networking tab and double-click Internet Protocol Version 4 (TCP/IPv4) from the list.

Double-click Internet Protocol Version 4 (TCP/IPv4). - Select the Obtain an IP address automatically radio box and click OK to save changes.

Select the highlighted option, then click OK. - Restart your computer for changes to take effect.