
Google Play services provides a connection between your apps, Google, and Android. It runs in the background of your Android device at all times and controls things such as push notifications, location requests by applications, updates, and other app-related processes.
Many Android users recently reported that their Google Play services kept stopping, making it difficult to use installed applications properly. Users will often encounter the error: “Google Play Services Keeps Stopping“. We found several troubleshooting steps that can quickly resolve this error.
Restart Your Phone
Many processes work in the background as you use your phone for your daily tasks. These processes leave an “electronic footprint” that will likely drain your RAM. When this happens, you are likely to face issues.
When your phone is restarted, all active processes end, and you are left with a fresh slate and usually a faster device. Therefore, we recommend restarting your phone to see if that solves the error. This is typically done by holding down the power button then selecting Restart.

Clear Cache & Data from Google Play Services
You might encounter the “Google Play Services Keeps Stopping” issue if your device’s cache data is corrupted. In this case, clearing cache and data should fix the problem. Please note that this might log you out of accounts you are currently logged into. Using this option will wipe your data on Google Play, and you will need to log in to your account again.
- Launch Settings on your phone.
- In the Settings window, navigate to Apps.

Launch App Settings on your Android device - Now locate and tap on Google Play services.

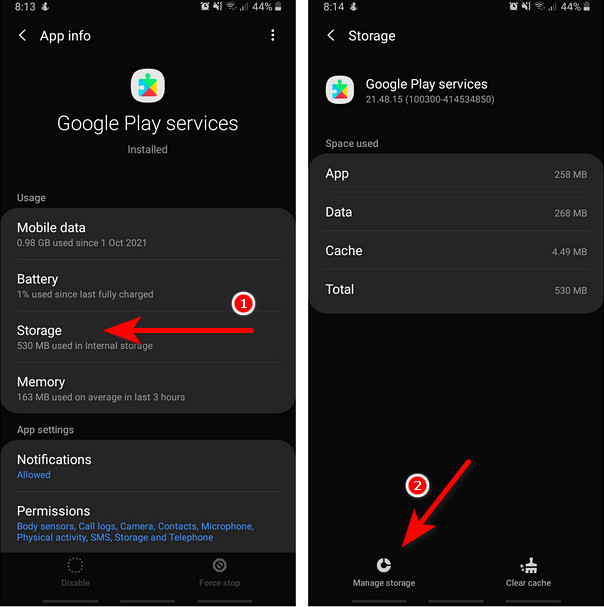
Launch Google Play services settings - In the next window, tap on Storage.
- Then, select the Manage storage option.
Manage Google Play services storage - Click on the CLEAR ALL DATA button and wait for the process to complete.

Clear all data of Google Play services - Then, follow steps 1-3 again, but select the Clear cache option this time.

Clear Google Play services cache
Uninstall Android System WebView Updates
Several users reported that uninstalling the Android System WebView app fixed the issue. The reason behind this is unknown as of now, but we suggest you give it a try.
- Launch Settings on your phone.
- In the Settings window, navigate to Apps and tap on Android System WebView.

Launch Android System Webview Settings - Tap on the three dots on the top right corner of your screen.
- Next, select Uninstall updates and wait for the process to complete.

Uninstall Android System WebView updates
Uninstall Google Play Services Updates
If the issue began occurring after installing Google Play services updates, one of the updates might have been corrupt. If this scenario applies to you, uninstalling the updates might fix the problem.
- Launch Settings on your device.
- Select Apps.
- In the Apps window, tap on Google Play services.
- Now click on the three dots on the upper right corner of the windows and select Uninstall updates.

Uninstall Google Play Services updates
Reset App Preferences
- Launch Settings.
- In the Settings window, navigate to Apps.
- Then, tap on the three dots in the window’s top-right corner and select Reset app preferences.
- Select Reset again and wait for the process to complete.

Reset app preferences on your Android - Once the process is complete, check if the error is fixed.
Login to Your Google Account Again
For this step, you will first have have to remove your account from your android device, and then add it back to sign in.
- Launch Settings and select Accounts and backup.
- From there, click on Accounts again.

Launch Accounts and backup settings - Now tap on the account connected to your Google Play services.
- Select Remove account.

Remove your Google account - Now sign back into your Google Play account and check if the issue is resolved.
Check the Date and Time
Many programs scan your device for relevant certificates and files before making any changes, such as installing software updates. However, if the time and date of your Android device are incorrect, these applications can reject the certificates and fail to perform the required tasks.
If you don’t have these set correctly, we recommend adjusting the time and date of your device, which can fix the “Google Play Services Keeps Stopping” error.
- Launch Settings and select General management.
- In the next window, tap on Date and time and then adjust the time, date, and time zone according to your location.

Adjust the date and time of your device
Check Google Play services Permissions
Google Play services might give this error because they haven’t been granted adequate permissions on your phone. Fixing this is quite simple:
- First, launch your phone’s Settings and go to Apps in that window.
- Next, navigate to Google Play services and tap on it.
- In the next window, select Permissions and check if Google Play services has adequate permissions. Finally, you can tap on the denied permissions and select Allow, as shown below.

Provide adequate permissions to Google Play services
Switch from Cellular Data To Wi-Fi
In some cases, switching from cellular data to Wi-Fi can also fix the issue. This is because Wi-Fi has no limitations on data usage and is generally faster than cellular, making it perfect for data-intensive tasks.
Factory Reset Your Device
If none of the methods above worked for you, this suggests that the error cannot be fixed using conventional troubleshooting methods. In this case, a factory reset is one of the only options left.
A factory reset will restore your device to its original, error-free state, thus resolving the error in the process.
Important: factory resetting your device means you will lose important data such as apps, contacts, pictures, videos, settings, and more. Only use this option after you’ve backed up your information.
- Launch Settings and select General management.
- Tap on Reset.

Select Reset option in General management - Now select Factory data reset and then finally hit the Reset button. Once your device resets successfully, check if the issue is resolved.

Reset your Android device